Skip to navigation Skip to content
Toika Loom Studio
  • My Account
  • Home
  • Floor Looms
  • Electronic Floor Looms
  • Go to Weaving Yarn Website
  • Knowledge Base
    • All Knowledge Base Articles
    • FAQs
  • Home
  • Floor Looms
  • Electronic Floor Looms
  • Go to Weaving Yarn Website
  • Knowledge Base
    • All Knowledge Base Articles
    • FAQs
  • 0 items
Home / Knowledge Base / How to configure your Toika ES in Fiberworks

Assembly Instructions

12
  • Tiina instructions
  • Getting started with the Anni loom
  • How to Assemble a Toika Eeva Computer Loom
  • Siru assembly video tutorial
  • Installing a second warp and back beam
  • Fitting Rubber Stoppers to an Underslung Beater Loom
  • Fitting the Underslung Fly Shuttle Device to a Toika Liisa Loom
  • Upgrading to ES Computer Control
  • Siru Assembly Instructions
  • Laila Assembly Instructions
  • Liisa Assembly Instructions
  • Eeva Assembly Instructions

Warping

2
  • How to drop the worm gear to release the warp beam
  • How to warp a loom from back to front

Weaving

1
  • Toika ES Start Up Sequence

Heddles

2
  • Texsolv heddle sizes
  • How to use Texsolv heddles

Reeds

2
  • Cleaning your new Toika reed
  • Toika reed information insert

Catalogues

2
  • Toika ES Brochure
  • Toika Hand Looms and Equipment Catalogue

Maintenance

1
  • Toika ES Maintenance

Toika ES

4
  • How to configure your Toika ES in Fiberworks
  • Upgrading to ES Computer Control
  • Toika ES Maintenance
  • Toika ES Start Up Sequence
View Categories
  • Home
  • Knowledge Base
  • Toika ES
  • How to configure your Toika ES in Fiberworks

How to configure your Toika ES in Fiberworks

1 min read

Before you can weave with Fiberworks Silver Plus you must add your loom configuration. Note that the Silver version only allows you to design with Fiberworks, for loom control you must purchase a licence for Silver Plus.

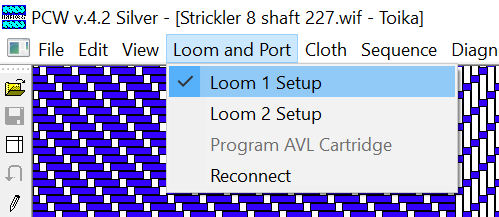
Click on the “Loom and Port” menu. You can configure two looms, but most of us only have one. Click on “Loom 1 Setup”.

In Fiberworks your ES unit is referred to as a “Dobby Interface”. Here’s the dialogue box for Loom 1:

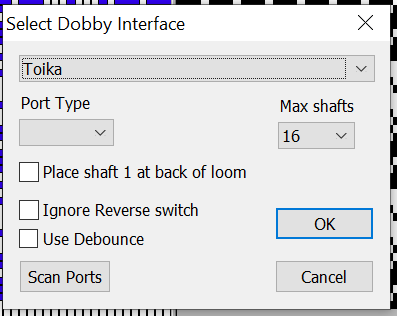
When your ES is plugged in to your computer is is given a Port identifier. This is almost always “COM3:”. If you aren’t sure, you can click on Scan Ports to identify the available ports. Choose the port under “Port Type”.

Make sure that you set the “Max shafts” value to match your ES unit: 16, 24 or 32. If you set this incorrectly, the picks may not be made in the right order.

By convention the frontmost shaft is number 1, even though the ES self-test starts with the rearmost shaft. We recommend that you don’t tick the “Place shaft 1 at back of loom” box unless you want to confuse yourself when threading!

It is useful to be able to reverse the pick sequence to “unweave” your mistakes. Don’t tick the box “Ignore Reverse switch”

Unless you have a weakness or tremor in the foot you use to operate the pedal you probably won’t need to tick “Use Debounce”. It ignores an accidental second press of the pedal within a fraction of a second of the first.

Click on “OK” to save your changes.

Updated on 15 May 2025
ES, ES-16, ES-24, ES-32

What are your Feelings

  • Happy
  • Normal
  • Sad
Share This Article :
  • Facebook
  • X
  • LinkedIn
  • Pinterest
Upgrading to ES Computer Control
Copyright © Toika Loom Studio 2025
  • My Account
  • Search
  • Quote Request List 0